Cool off on hot summer days with these easy-to-make, refreshing vegan treats! Indulge in the perfect blend of creamy coconut, rich hazelnut flavour, and decadent brownie goodness. These delightful popsicles are not only dairy-free, gluten-free, and vegan, but they're also high in protein, making them a guilt-free indulgence for everyone. Coconut Hazelnut Ice Cream Popsicles with Brownie Balls recipe by Nara Paliga, a local food photographer, recipe developer and a blogger behind Happy Belly Creations.

No Popsicle Tray Needed! Less Cleaning, More Fun!
Say goodbye to the hassle of cleaning popsicle trays with this convenient recipe. We'll show you how to create these delightful frozen treats without any special equipment.
Step 1: Creamy Coconut Hazelnut Ice Cream
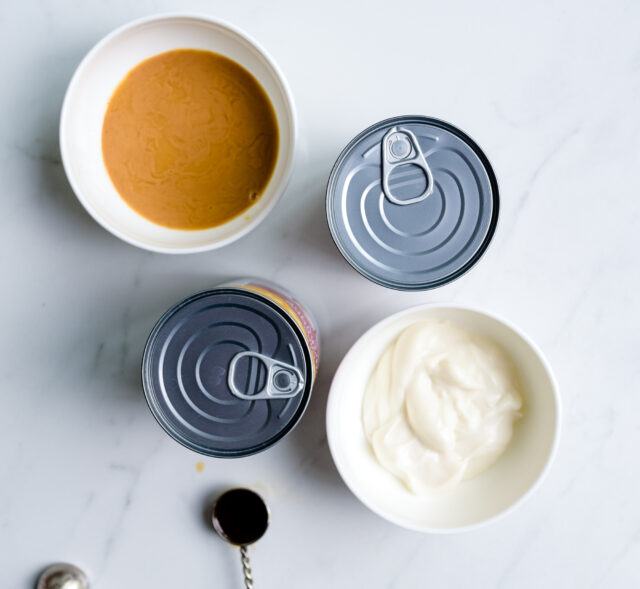
In just a few simple steps, you'll have a creamy coconut hazelnut ice cream base that will leave you craving more.
- Blend together, using a food processor, coconut milk, hazelnut butter, coconut yogurt, maple syrup, vanilla extract, and a pinch of salt until smooth and well combined.
- For those with a sweet tooth, feel free to add extra maple syrup for a sweeter treat.
Step 2: Brownie Balls for Extra Indulgence
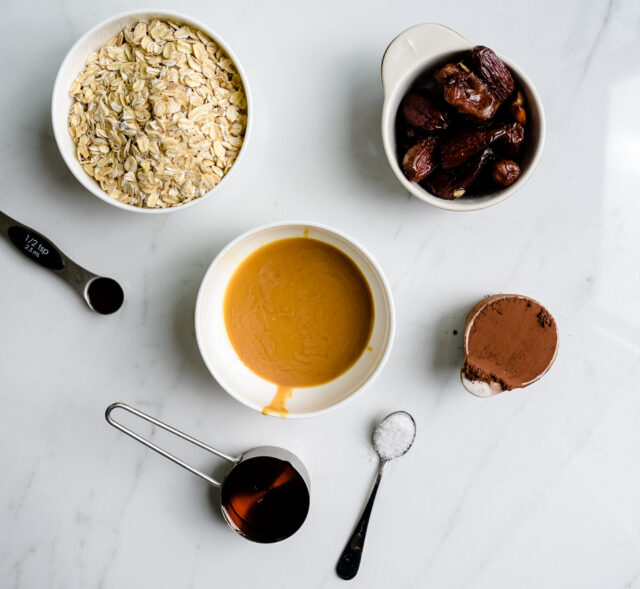
Take your ice cream to the next level with delightful brownie balls. These rich, chocolaty morsels will make each bite a true delight.
- Blend gluten-free rolled oats, pitted dates, hazelnut butter, cocoa powder, maple syrup, vanilla extract, and salt until smooth and well combined.
- Shape the mixture into 1-inch balls.
Step 3: Bring it All Together

Now it's time to combine the creamy coconut hazelnut ice cream with the indulgent brownie balls.
- Pour the ice cream mixture into a cling wrap-covered baking tin, ensuring even spreading.
- Gently place the brownie balls into the ice cream mixture.
- Freeze for 4-6 hours or until solid.
Step 4: Easy Popsicle Assembly

Get ready to enjoy these refreshing treats on a stick! No more struggling to remove popsicles from trays.
- Lift the cling wrap to release the ice cream block from the tin.
- Place the block on a cutting board and cut into desired popsicle shapes.
- Insert a popsicle stick into each piece, about halfway through.
- If the ice cream starts to melt while handling, simply pop it back into the freezer for a quick firming up.
Step 5: Chill and Savour
The final step is to let the popsicles freeze completely before enjoying every cool, creamy bite.
- Transfer the popsicles to a tray or plate lined with parchment paper.
- Return them to the freezer and let them freeze for another 1-2 hours, or until completely solid.

Take a Bite into Summer Bliss
These coconut hazelnut ice cream popsicles with brownie balls are the ultimate summer treat. You can even eat this treat as an ice cream and scoop it up and place it in a sugar cone.
A Snack You Can Feel Good About
As a parent, you can rejoice knowing that these popsicles are not only irresistibly tasty but also packed with wholesome ingredients. They are vegan, dairy-free, and gluten-free, making them a fantastic option for children with dietary restrictions or allergies. Plus, they provide a good dose of protein, ensuring that your little ones stay energized and satisfied.

Creating Memories in the Kitchen
I love getting my kids involved in the fun by inviting them to help me prepare these delightful treats. From pouring the ingredients to shaping the brownie balls, they love being part of the process. And the best part? Less mess and no need for a popsicle tray, making cleanup a breeze.
About Nara Paliga, creator of Happy Belly Creations
From Wanderlust to Wholesome Kitchen Adventures: Meet Nara Paliga!
Once a travel blogger with a passion for exploring new horizons, Nara has embarked on an exciting journey that led her from marketing executive to doting mother of three young children. Today, she's a talented local food photographer, recipe developer, and a true culinary enthusiast.
A Childhood Filled with Flavourful Traditions
Cooking has always held a special place in Nara's heart, tracing back to her early days as a little girl. Growing up in a family of culinary experts, with her father and grandfather as chefs, she was immersed in the world of unique, authentic, and hearty meals. It was through these flavoursome experiences that her passion for creating wholesome dishes blossomed.
A Wholesome Journey and Creative Ventures
In addition to her dedication to family-friendly cooking, Nara has embarked on a personal gluten-free journey and has found her way to recovering from years of inflammation. Drawing from her own experiences, she has incorporated gluten-free options into her recipes, ensuring that they cater to a wide range of dietary needs.
A Year of Culinary Accomplishments
In just one year, Nara's blog Happy Belly Creations has flourished, showcasing an impressive collection of 140 dairy-free and gluten-free recipes. She has also created a meal plan and generously offers free downloadable dinner ideas to help others navigate the challenges of family cooking. Additionally, Nara showcases her creative talents by freelancing in food and product photography and videography, capturing the beauty and essence of her culinary creations.
Join Nara's Wholesome Kitchen Adventure
Whether you're seeking inspiration for simple yet delicious family meals, looking to embrace a gluten-free lifestyle, or in awe of captivating food photography, Happy Belly Creations is the perfect destination. Join her on a journey of flavour, love, and wholesome cooking as she continues to share her passion for creating nourishing dishes that bring joy to the table.
- 2 cans (14 oz each) coconut milk
- ½ cup hazelnut butter
- ½ cup coconut yogurt
- ¼ cup maple syrup (adjust to taste)
- 1 teaspoon vanilla extract
- Pinch of salt
- For the brownie balls:
- 1½ cups gluten-free rolled oats
- 1 cup dates, pitted
- ½ cup hazelnut butter
- ¼ cup cocoa powder
- ¼ cup maple syrup or agave nectar
- 1 teaspoon vanilla extract
- ¼ teaspoon salt
- Step 1: Creamy Coconut Hazelnut Ice Cream
- In just a few simple steps, you'll have a creamy coconut hazelnut ice cream base that will leave you craving more.
- Blend together, using a food processor, coconut milk, hazelnut butter, coconut yogurt, maple syrup, vanilla extract, and a pinch of salt until smooth and well combined.
- For those with a sweet tooth, feel free to add extra maple syrup for a sweeter treat.
- Step 2: Brownie Balls for Extra Indulgence
- Take your ice cream to the next level with delightful brownie balls. These rich, chocolaty morsels will make each bite a true delight.
- Blend gluten-free rolled oats, pitted dates, hazelnut butter, cocoa powder, maple syrup, vanilla extract, and salt until smooth and well combined.
- Shape the mixture into 1-inch balls.
- Step 3: Bring it All Together
- Now it's time to combine the creamy coconut hazelnut ice cream with the indulgent brownie balls.
- Pour the ice cream mixture into a cling wrap-covered baking tin, ensuring even spreading.
- Gently place the brownie balls into the ice cream mixture.
- Freeze for 4-6 hours or until solid.
- Step 4: Easy Popsicle Assembly
- Get ready to enjoy these refreshing treats on a stick! No more struggling to remove popsicles from trays.
- Lift the cling wrap to release the ice cream block from the tin.
- Place the block on a cutting board and cut into desired popsicle shapes.
- Insert a popsicle stick into each piece, about halfway through.
- If the ice cream starts to melt while handling, simply pop it back into the freezer for a quick firming up.
- Step 5: Chill and Savour
- The final step is to let the popsicles freeze completely before enjoying every cool, creamy bite.
- Transfer the popsicles to a tray or plate lined with parchment paper.
- Return them to the freezer and let them freeze for another 1-2 hours, or until completely solid.
- Take a Bite into Summer Bliss
- *These coconut hazelnut ice cream popsicles with brownie balls are the ultimate summer treat. You can even eat this treat as an ice cream and scoop it up and place it in a sugar cone.
Summer Fun Coconut Hazelnut Ice Cream Popsicles with Brownie Balls was written by Nara Paliga. Follow Nara on Instagram and check out her recipes on the website Happy Belly Creations.
More Reading
- Allergen-Friendly Recipe Remix: Ice Cream!
- 48 Ice Cream Recipes from Canadian Bloggers
- Keep Cool with Over 15 Ice Cream Sandwiches
You can unsubscribe any time!


Leave a Reply