 Have you heard the terms “white balance”, “colour shifts”, and “colour temperature”? Do your have no idea how they relate to your photography? Don’t worry; Taylor Mathis is here to fill you in on what you need to know to always have the correct white balance in your food images.
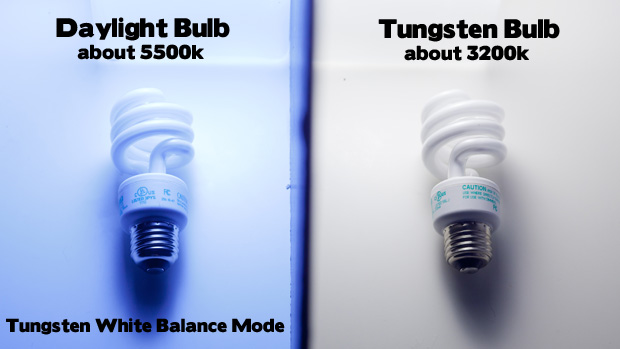
1. Use the correct camera settings for your light source
Every light source has a colour temperature that is measured in units called Kelvins. In most shooting environments, you will have a Tungsten (around 3200K) or Daylight (around 5500K) light source. Tungsten light sources are mainly found in halogen light bulbs. Daylight lighting is found in daylight balanced light bulbs and in natural daylight. The lower you go on the scale, the warmer (more orange) the light will look. The higher you go on the scale, the cooler (more blue) the light will look. Your camera has different white balance modes. Make sure that your camera is set to the correct mode for your light source.

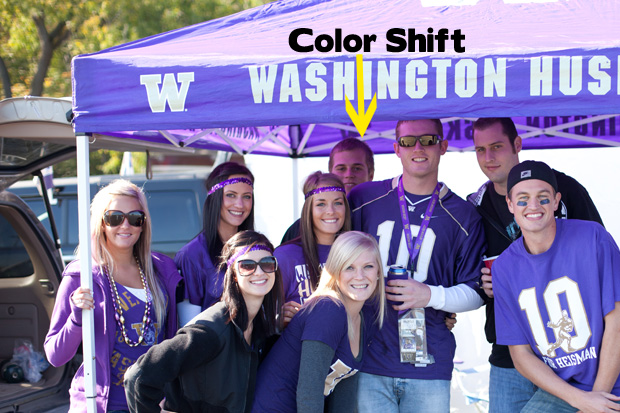
2. Minimize Colour Shifts
Have you ever worn a bright pink shirt while shooting and found that the whites in your image had a pink tint to them? Have you ever taken pictures at a farmers market under the nice even light below a purple tent and found your images had a purple cast to them? If so, you have experienced a colour shift. If your light source shines through a coloured source (like a red tent) or coloured clothing reflects into the picture, your whites can shift in colour. To prevent this, use clean white diffusion material for your light source and avoid wearing clothing that could cast a colour on set.
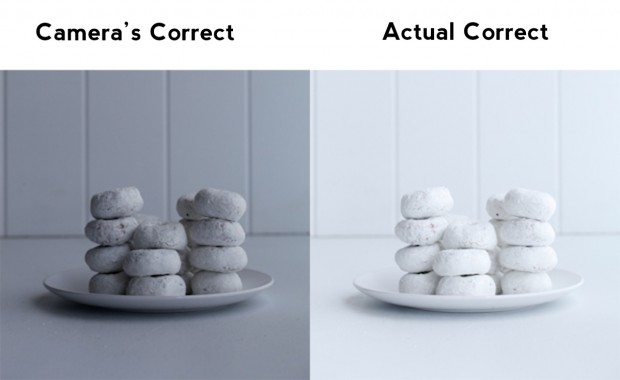
3. Expose properly
Have you ever taken a picture of an all white scene and it turned out grey? When you have a predominantly white scene, your camera wants to expose it as grey. You will have to increase the exposure to make the whites pure white. Don’t be surprised if you have to significantly increase the color.
4. Use a WhiBal® or Colour Checker Card
Using a reference card like a WhiBal® or Colour Checker Card allows you to correct your image’s white balance in post-production. In one of your images, place the colour reference card in the picture. If you use Adobe Lightroom® for your post-production, you can place the White Balance Selector tool on the grey of the reference card. This will work for most applications. If you are photographing products where colour has to be 100% accurate then you can take the reference card into Photoshop® and use the curves to achieve precise colour balancing. For your everyday food shooting, the grey of a reference card will do just fine.

5. Shoot in RAW
There are times when you will want to have the ability to adjust the white balance of your image in post-production. Maybe you didn’t use a reference card, maybe it was shady outside and you were shooting in sunny white balance mode, but whatever the reason these things can be fixed in post-production. To have the most flexibility, you will need to capture your images as RAW files. Shooting in RAW makes use of all of your camera’s megapixels and captures the most information you can. Having all of this information gives you the most flexibility in adjusting the colour balance.
To sum all of this up, if you
- shoot in the appropriate white balance mode for your light source,
- stay away from colour shifts caused by wardrobe and diffusion material and
- expose properly
you will have no problems with having vibrant whites in your images. If you want to further adjust your colour in post-production, use a reference card and shoot in RAW.
Written by Taylor Mathis, professional food photographer and author of Taylor Takes A Taste.com.
Follow Taylor on Twitter and if you have questions about food photography, feel free to email Taylor.
You can unsubscribe any time!


Thanks for the tips I will use them!
Thanks! I have a quick question, in the article it says: ”If you use Adobe Lightroom® for your post-production, you can place the White Balance Selector tool on the grey of the reference card”
How do you use this? I usually shoot RAW and in Adobe Lightroom adjust the White Balance just by sliding the setting.
Always appreciate articles about food photography. So easy to just point your iphone and tap the screen… but it’s so much more than that!!
Great tips! Thanks so much. I’d LOVE to win those e-magazines, sounds interesting!
Great tips – proper white balance is key to capturing a nice image. For film we use an 18% grey card for reference, is that the same thing as a WhiBal® or Colour Checker Card?
I have a lot to learn so I really appreciate the tips!
These are awesome tips! Thanks!
Please do not enter me in the giveaway, I just wanted to thank you for the article!
There are some great tips here – especially the one about colour shift. I recently had to re-shoot an entire series of photos because my bright pink shirt caused colour balance issues in parts of the shot. Such a pain.
@Helene: The White Balance Selector is the little eye dropper that’s in the upper left corner just above the colour balance sliders. To use it, you simply click on the eye dropper and then click on a neutral grey in your image, and it’ll automatically adjust all the sliders for you. It’s magical! 🙂
So interesting! I really need some photography help because all of this is new to me. And I have a feeling that Sunday Feb 14th date is a lil off!
Thank you for this informative article. I’m working at improving my photography and any help I can get is most welcome!
Thanks for the tips, I definitely have a lot to learn about photography!
[…] Taylor Mathis gave us Five Ways to Improve your Picture’s White Balance […]