In our Food Styling 101 series, Lisa Bolton offers up food styling tips for conveying the stories you want your food to tell. Her advice will help you create food photography that entices readers to make your recipes and read your articles. This month she shares her tips on everyone's favourite food (right?): how to food style ice cream, and other delights that melt.

Ice cream is one of the most popular foods photographed on Instagram. And for good reason. It's hard to find anything but joy in the image of a perfect swirl perched atop a waffle cone with the sunshine beaming against a brick wall. And while that may work great when someone is handing you the cone already done, for people looking to share their best homemade versions of ice cream, it takes a bit more prep work.
First, this article is about food styling real ice cream. There are definitely recipes out there for how to make fake ice cream. While I haven't experimented with that technique, I appreciate its use in editorial shots. As a recipe developer, I'd never use fake ice cream pictures in support of a recipe for ice cream. I would, however, consider fake ice cream if I were shooting lifestyle or tablescape and the ice cream was playing the role of prop, not hero. For this discussion, all tips apply to shooting the real thing.
And while ice cream is a very universal food that needs little explanation, it has an obvious downside. It melts. And melts fast.
Before You Set the Scene
There are certain foods that are more forgiving to the passage of time as you style. Soup, salad and sandwiches can hold up well to a bit of on-the-fly styling. Ice cream is not that food. Unless you're shooting in a walk-in cooler, you have mere minutes before you have a creamy soupy mess or you need to refreeze. Here are some tips to making the most of the few minutes you do have.
Make Room in Your Freezer
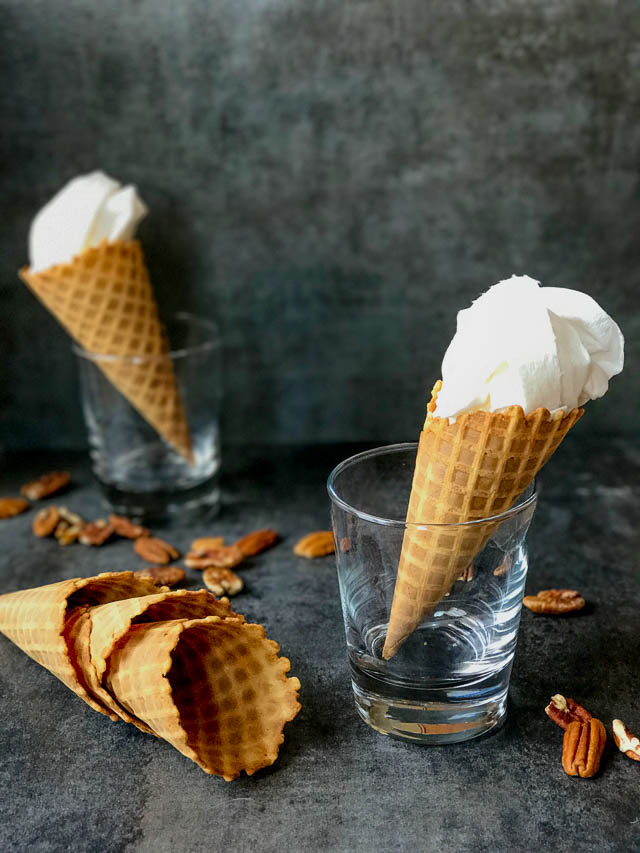
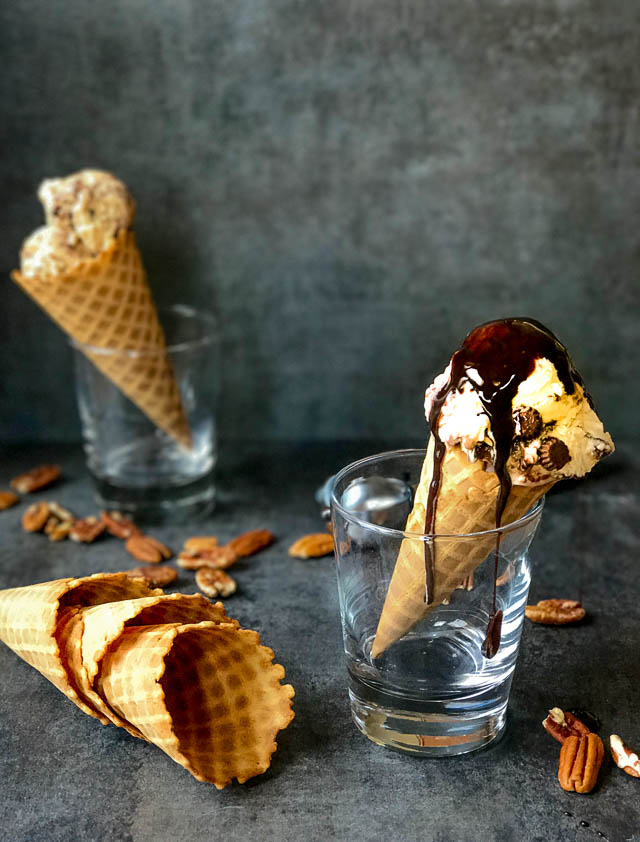
Even with the most planned-out shots sometimes they just don’t go as planned and you need to reshoot. If you're shooting in cones, it's helpful to be able to pop them in a glass and place them back in the freezer again. You don’t want to be shuffling around frozen chicken as your perfect scoop melts away.
Freeze a Sheet Pan
Put a sheet pan or plate in the freezer for about 10 to 15 minutes. When you're ready to scoop, pull the pan/plate out as well as your ice cream. If the ice cream is rock hard, pull it out a couple minutes before you pull the plate out.
Pre-Scoop Your Ice Cream
The best way to get that perfect scoop that will last is to pre-scoop the ice cream and place it on a pre-chilled sheet pan. To get that perfect scoop you want one fluid motion. Slowly drag the scoop through the ice cream in a slight S motion and drop it onto the chilled pan. Scoop a few more scoops than you think you'll need. Pop the pan with the scoops back into the freezer and begin to plan your shots.
Set the Scene & Get the Shots … Quickly!

Backgrounds and Props
Ice cream is the perfect time to try out colourful props and backgrounds. Pinks, blues and purples all pop against a lot of different flavours. Marble, slate and stone are all good backdrops for ice cream as well. Wooden backdrops are great IF the ice cream isn't touching the wood. It doesn’t quite make sense to have a melty ice cream cone inverted onto wood.
The Scoop
The fail-safe prop is the ice cream scoop itself. Other great prop choices are extra cones and bowls, the ingredients that make up the ice cream and toppings: chocolate syrup, honey and sprinkles are all easy, affordable ways to highlight the dessert.
Use Stand-Ins
I use paper towel wrapped around tin foil as my stand-in. Paper towel doesn't quite hold the shape as well as tin foil does but the color of paper towel is a better stand-in for the color of my frozen treat. This is the only time during an ice cream shoot where you really have unlimited time. I plan out all my shots, backdrops and garnishes. Everything is pre-chopped and ready to go. When the ice cream comes out, you want to be able to move quickly.
When you're absolutely ready to go, it's time to bring out the ice cream. Using a butter knife, slide the scoop off the pan and onto the cone or into the bowl. Sometimes I stuff paper towel into the cone or bowl so I don’t have to fill a whole cone. After the shoot I can easily slide the scoop of ice cream back into a bowl and into the freezer to be enjoyed later.
FOOD WASTE TIP: On that note, I'm very conscious about food waste. In our house we eat everything I shoot, and with ice cream that's usually not a problem. If, however, the ice cream gets really melty, I just scrape it all into a bowl, pop it back into the freezer and it’s great for making milkshakes.
Different Shots
There are a few common ice cream shots. If you're looking to capture a variety of looks for your ice cream, approach them in this order.
The No-Churn Loaf Pan
If you're making a no-churn ice cream, getting that first scoop can be a real winning shot. It's more difficult to recreate so capture it before you pre-scoop. Overhead or three-quarters will showcase the ice cream best. Consider reading last month's article on shooting raw ingredients and add them into the loaf pan shot to highlight the flavours that went into the ice cream.
Straight-On Scoop
After using the paper towel stand-in, get ready for the close-up, straight-on shot to capture your ice cream prefectly frozen. This is about the time you may be able to capture your first drip. And while a perfectly frozen scoop is beautiful, the real awe factor often comes from a teardrop of syrup or melt.
Flat Lay or Inverted Cone
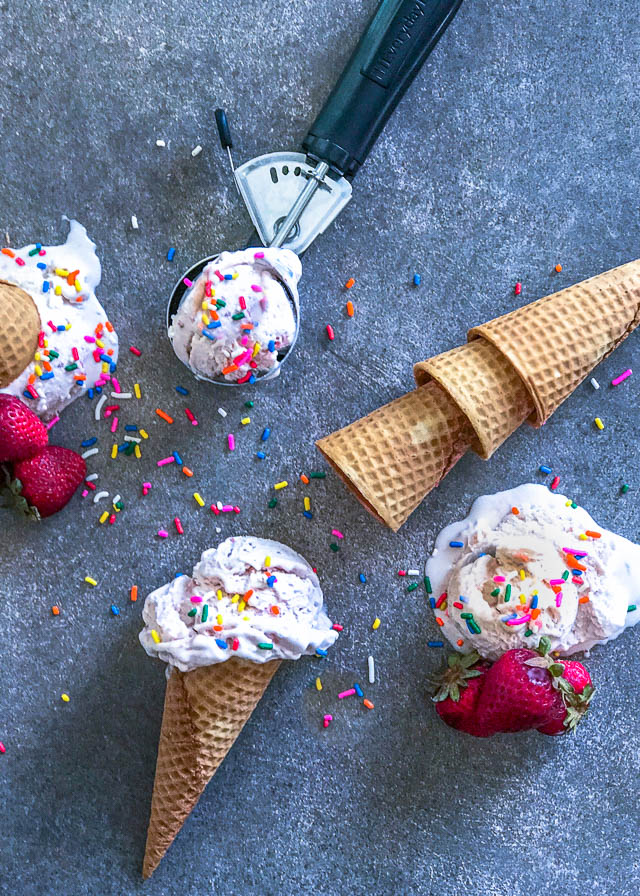
As the ice cream starts to melt, that's the time to capture a flat lay or inverted cone shot. If possible, store your backdrop surface in the freezer until you're shooting on it. Marble and slate will hold cold temperatures for a good amount of time and give you a bit of extra shoot time. This is great time to bring out the toppings — random sprinkles, syrups, whipped cream, nuts and fruit will connect the viewer and bring back memories of their favourite toppings.
Ice Cream Bars and Popsicles

These are great foods to practice your styling with foods that melt. Bars will hold together a little longer and you can take a flat lay approach; they're a bit more forgiving as they melt.
Ice cream can be a such a fun food to shoot. Consider just buying a tub of vanilla and a box of cones for a quick and inexpensive way to practice different techniques. And if your ice cream melts to a puddle of creamy goodness, just re-freeze, pop it into a blender and get started on your milkshake styling!
MORE READING
- Food Styling Raw Ingredients for the Camera
- Food Styling: Styling Cakes for the Camera
- Food Photography: Styling and Photographing Cookies
Lisa Bolton is the creator, writer and photographer behind Food Well Said, her blog about bringing thoughtfully prepared, whole food recipes. She lives in the Lower Mainland of BC and you can reach her on Instagram, Twitter, Pinterest and Facebook.
You can unsubscribe any time!


What a great article with very good tips. I love the idea of using stand ins and paper towel to “bulk” up the ice cream cone. Can’t wait to use these tips and play around with shooting ice cream!
Great tips – thank you!