
We all know that having well-organized computer files can save you a lot of time and aggravation. In fact, I’m willing to bet that most bloggers learn early on that not labeling your files, or failing to keep your blog files in one folder, can result in hours of frustration.
But are you taking steps to preserve your files and future blogging opportunities? Let me explain:
Let’s say a popular lifestyle magazine wants to publish one of your photos. Great! They just need you to send them a large, printer-friendly, version of the file. Uh-oh…
I’ve talked about optimizing your photos for your blog, which involves changing the photo’s resolution from 300 dpi to 72 dpi. I also said that if you’re planning on printing your photos, be sure to save the original file. I didn’t explain why, though.
The reason is that if you try to print a photo that has been saved at 72 dpi, you will get a blurry, low-quality image. The image just doesn’t have enough pixels per inch to deliver a crisp, detailed printed picture. You can learn more about image resolution by reading this article.
It’s a good practice to save both a web-friendly 72dpi image and a print-friendly 300dpi image. Personally, I like to leave my 300dpi image as a layered Photoshop (.psd) file, so that I can remove my watermark or make changes to the image easily.
Let’s look at another scenario.
You’ve been backing up your blog using a plugin, and your site suddenly goes down. No problem right? You can just restore your blog from the files created by the plugin. Except, something has gone wrong. The backup files are corrupt, or that plugin is no longer functioning, what are you going to do?
I know that the idea of a backup plugin failing is unlikely, but it’s important to remember that not everything on the Internet stays forever. Websites go down, companies close, and your content can disappear permanently.
Creating a Blog File Organization System
To protect all that hard work you’ve been doing, you need to take your file organization to the next level. Think about all of the words, numbers, images and links that you’ve published on your blog. Now I’m going to tell you to put a copy of all of that on your computer. Here’s how!
1. Designate a master folder on your computer for your blog.
If you have more than one blog, you will need a separate master folder for each website.
2. Create subfolders inside of your main folder.
You can organize your website’s content by creating folders for posts, graphic designs (you logo, favicon etc.), backup files etc.
3. Create a folder for every single blog post that you have ever written.

If you’ve been blogging for more than a year, you might want to create subfolders in your main folder that are labeled by year or month and then place your post folders into these subfolders accordingly.
4. Label your post folders in a way that will make sense to you.
 I recommend using the name of the blog post as the folder name, because this makes it easier to find your content later on.
For example, instead of writing “chicken burgers” for my Tex-Mex Chicken Burgers post, I would write the whole title out. That way if I ever do another chicken burger post, I can easily differentiate one set of files from the other. It’s also a good idea to add the date to your title in a format that makes sense for you.
5. Each post folder should include everything you used to create that post.
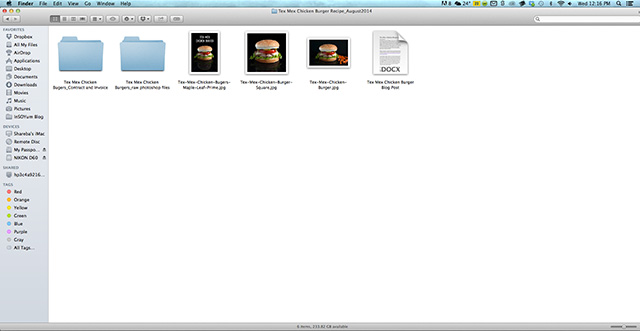
This can include:
- Original unedited images
- Large 300 dpi printer-friendly images
- Small 72 dpi web-friendly images (possibly with your watermark)
- A text document version of your post*
- A text document with any research used to write that post
- Your contract, if the post was sponsored, plus the invoice you sent your client
*To create a text document version of my post, I just copy and paste the entire post from WordPress into Microsoft Word. This preserves my texts, links and recipes.
Ok, so now you have an organized, well-labeled folder system with all of your content. Excellent!
Now we just have to find somewhere to put it. Let’s be real, that master file is probably huge now!
You could leave it on your computer’s hard drive. This would give you fast access to your files, but it might slow down your system. Also, if your computer ever dies you could lose all your files.
I prefer to keep my files on an external hard drive. It’s almost as convenient as keeping them on my main hard
drive, but my files are protected (unless I accidently reformat the drive… which has happened). The only downside of this option is that large external hard drives can be pricy. I paid $80 for mine.
Another option would be to store your files in a cloud service, like Dropbox. That way the files are completely off your system. Most cloud services are free at first, but you might have to pay to get enough space to host all of your files. Additionally, like I mentioned before, just because this service is available online doesn’t mean it will always be there.
I hope this article helps you protect and organize your blog’s content. If you’ve been maintaining a great file system, please share your tips!
Shareba Abdul is a food blogger and freelance writer from the GTA. She holds an Honours Bachelor of Applied Arts in Media Studies, a Diploma in Journalism, and has a passion for writing, photography, and blogging. You can check out her yummy discoveries at InSearchOfYummyness.com or connect with her on Facebook, Pinterest, Twitter and G+.
You can unsubscribe any time!


I like this however the only thing I would add is, I think all images should go into one folder aswell. Every image used, what it was used for,when it was used and credit the author or source.
Really loved how you broke down blog organization and content protection into super easy, practical steps—makes the tech side feel totally manageable and stress-free!